Fon Serial Cable
Before reading the rest of this page, be aware, you are not simply modifying a USB cable and cannot use a normal USB cable with the end chopped off. You must use a special USB to Serial type cable as the one specified below.
This is a guide for building a USB to serial cable to connect a PC and a Fon (2100) or Fon+ (2201). I haven't got a 2200 but from what I've read it should work as well. Obviously, if you are going to build one of these you do it on your own head and if anything dies it isn't my fault.
First, buy a cable. The one I'm using here I got off eBay and was described as "USB Cable for Kyocera KX440 KX433 KX444 K4130 K404 K9".
The cable comes with a 3.5mm jack on the end, you are going to chop this off and replace it with a set of plugs. To do this you need to know which wires are which, you'll need to find the transmit (Tx), receive (Rx) and ground (Gnd). I asked on various lists about how best to do this and got some quite complex answers and one really simple answer. The simple one is to chop off the jack plug then using this pin out diagram use a multimeter to reverse the pins back to the wires.
This is what mine looked like: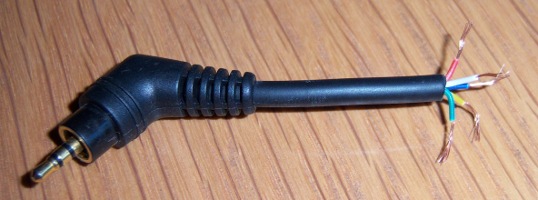
I simply touched the meter to the tip and checked each wire till I got a connection. I then repeated till I found each one. The three important ones on mine were:
- pin 1 = yellow = Rx
- pin 2 = white = Gnd
- pin 6 = red = Tx
Before doing any soldering I wanted to test I was right and had the right connections. I'd read that if you get a terminal going and connect Rx to Tx you will see the characters you type being echoed back. I plugged the USB end in and checked dmesg to find out what device had been created, it was ttyUSB0. I then started up putty and configured it to use 9600, 8, 1 and I've been told to make sure that flow control is set to none or software. I once forgot to change it and with it at XOn/XOff and it still worked. Better safe than sorry though and change it to none just to be sure. Holding my breath I shorted the two wires, got a half line of garbage then started typing and saw my input echoed back. It worked!
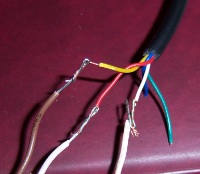
Next step is to solder the cables to a set of pins. I used two two pin connectors from an old motherboard. Here is the soldering job:
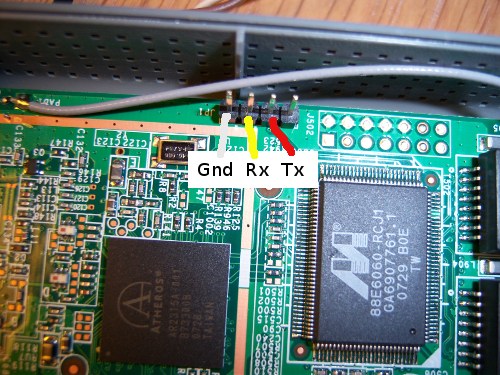
Finally you are ready to connect it all up and test it. Here are the pin outs for the two devices.
Fon
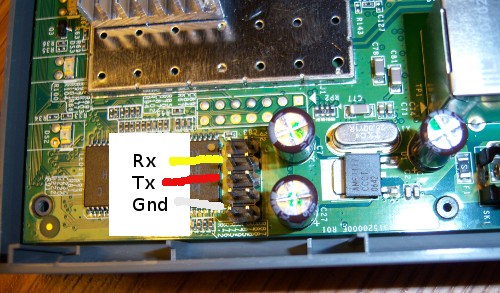
Fon+
Finally its time to put it all together, plug it in and test it. I've found that sometimes I can just plug all 3 pins in, power it up and get a connection straight away, sometimes I've found that I get partial output mixed with garbage. From reading around, some people suggest powering the device up with just Rx and Tx connected then after a second or two connect the ground. This worked for me and I found that most times I got a good connection and could send and receive data.
Here is the cable connected to the two devices:


Notes
A lot of the guides I've read talk about just using Tx and Rx with no mention of ground. This is the way I built my first model however without ground you can only receive data, there is no transmit.
I used a pair of two pin connectors so I could use the cable with both the Fon and the Fon+. I was tempted to put two end pieces on, a three pin for the Fon+ and a four pin one for the Fon but I decided that the more bits of wire and the more pieces the more chance there is for something to go wrong. I've made sure I've noted down which ends are which and which way round the connectors need to go.
Obviously, when you are doing this you are playing with electricity and shorting things or plugging things in the wrong way round could easily damage your device or the PC it is connected to. Having said that, I haven't soldered for years and by taking it slowly and checking things at each step I was fine and didn't destroy anything. If you aren't confident there are people who sell pre-made cables so just buy one of those.
