Domain Fronting with CloudFront
A worked example
Mon 11th Feb 19
This post accompanies the post A 101 on Domain Fronting and in it we are going to setup both a site to use for domain fronting and then a fronted site.
The walk-through has the following players:
- The fronting hostname - fronted.digi.ninja
- The "good" origin - digi.ninja
- The "good" CloudFront domain - d1pticz0uvhz4n.cloudfront.net (will explain where this comes from later)
- The "bad" origin - frontme.vuln-demo.com
- The "bad" CloudFront domain - d1sdh26o090vk5.cloudfront.net (will explain where this comes from later)
Setting up the "good" origin
If you want, you can skip this step and jump straight to setting up the site to be fronted. If you do this, you'll need to find a site hosted on CloudFront to do the fronting through.
To start off, log in to your AWS account and from the services menu, pick CloudFront. Click "Create Distribution" and pick the "Web" option.
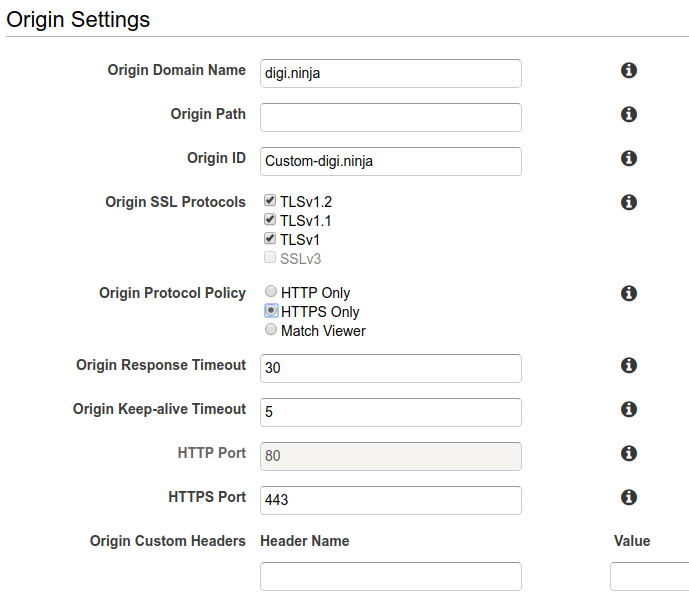
In the "Origin Settings" section, the hostname of the existing site (digi.ninja) goes in the "Origin Domain Name" box and you have to give the setup a unique name in the "Origin ID" box. You'll notice that as soon as you've entered the origin hostname, a new set of inputs are drawn. Something that had me frustrated for a long time is that the "Origin Protocol Policy" is set to "HTTP Only" by default. My digi.ninja site listens on both HTTP and HTTPS but has a redirect to HTTPS in place and has HSTS enabled, with the policy set to HTTP only, every time I tried to access my site through the fronted domain I got a 403 error. If your origin site runs over HTTPS then you have to change this setting otherwise it wont work.
All the settings in the "Default Cache Behavior Settings" box can stay as they are.
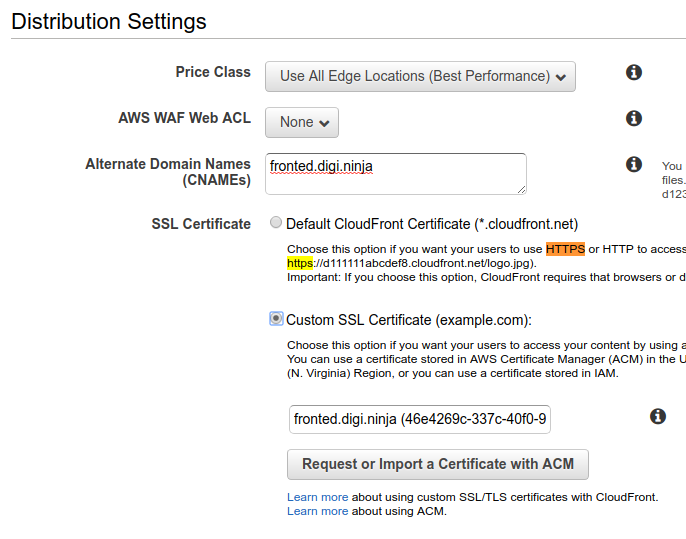
In the "Distribution Settings" box, if you want the site to be realistic, change the "SSL Certificate" setting to "Custom SSL Certificate (example.com)" and then use the "Request or Import a Certificate with ACM" to generate a certificate. I'm not going to cover doing that here, it is fairly easy to work through and you can authenticate your domain through either DNS or email. You also need to enter the hostname that will be used to access the site (fronted.digi.ninja) in the "Alternate Domain Names (CNAMEs)" box. As with messing up the origin protocol, without this you'll get a 403 error when you try to access the site through the hostname.
Once you've done that, you can click "Create Distribution" and leave it to do its thing. I found it took a little while to set things up so don't expect it all to work straight away. The screen you get returned to should look a little like this except with a status of "In Progress".

While the site setup is processing, you need to create a CNAME entry for the domain (fronted.digi.ninja) and point it at the domain name listed in the table, in my case "d1pticz0uvhz4n.cloudfront.net". Once the roll out has been completed, the status in the console will change to "Deployed" and you will be able to access it through both the DNS name you just set up (fronted.digi.ninja) and through the CloudFront domain (d1pticz0uvhz4n.cloudfront.net).
If the CloudFront URL works but the other doesn't, you've made a mistake somewhere in the setup and you'll need to go back and debug it. It took me a few sessions over a couple of days to get it right, especially with the fact it can take 10 - 15 minutes to redeploy each time.
Once all this is done and working, you can move on to the easier step, setting up the domain to be fronted.
Setting up the "bad" origin
This step is very similar to the previous step. Start the process and put the name of the site you want to front (frontme.vuln-demo.com) in the "Origin Domain Name" field. As you won't be accessing the site directly, by its own name or by the CloudFront name, you don't need to make any changes to the "Distribution Settings" box. Complete the process and let the deployment begin.

Once the site has been deployed, you should be able to browse to it using the domain name it has been allocated (d1sdh26o090vk5.cloudfront.net). Again, any errors, get debugging.

If you are wondering why we only did half the setup, and did not put some variation of the "bad" origin into the "Alternate Domain Names" field, then it is because it is not needed. It could be set up in this way and then used in the Host header in the next section, but assuming the C2, or sensitive browsing, will at some point be detected, having an anonymous looking CloudFront hostname in the header is much better than having something that references the real origin. Getting caught while the origin is still up will allow the responders to simply view the content by browsing to whatever value you have used, but if, by the time you are caught and traffic analysed, the origin has been taken down, then all they will be left with is a random string which does not mean anything to anyone.
Testing the fronting
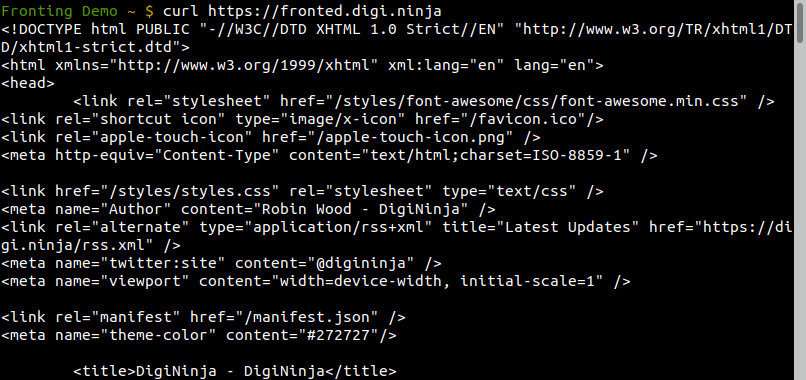
Now you've finally got all the pieces in place, it's time to do some domain fronting! As we covered in the walk-through, the way fronting works is to use the "good" hostname (fronted.digi.ninja) to make the network connection and then the "bad" CloudFront hostname (d1sdh26o090vk5.cloudfront.net) in the Host header. You can do that in curl in the following way:
curl -H "Host: d1sdh26o090vk5.cloudfront.net" \
https://fronted.digi.ninja/
This is what we get.

Success! For anything checking connections based on DNS lookups, the request went to the "good" site (fronted.digi.ninja), but once CloudFront got the HTTP request, it saw the Host header for the "bad" CloudFront hostname (d1sdh26o090vk5.cloudfront.net) and that is what it returned data based on.
Finding Domains
If you don't want to go through the trouble of setting up your own domain to run this through you'll need to find one to use. Here are some posts and tools that might be useful.
- How I Identified 93k Domain-Frontable CloudFront Domains
- Domain Fronting Via Cloudfront Alternate Domains
- FindFrontableDomains
